Tag Archives: imaging

Microscope Types

Microscopes come in many forms.

Optical microscopes use visible light and glass lenses to image samples, and are limited to around two-thousand-times magnification and imaging samples down to 200 nanometres.

Electron microscopes use a fine beam of electrons to image samples by measuring how the beam is transmitted (or more rarely reflected) by the surface. Because the wavelength of an electron is much smaller than the wavelength of visible light, electron microscopes can magnify by ten million times and image samples down to 50 picometres (fifty trillionths of a metre). Electron microscopes use electrostatic and electromagnetic lenses to focus the electron beam and detect images with CCDs.

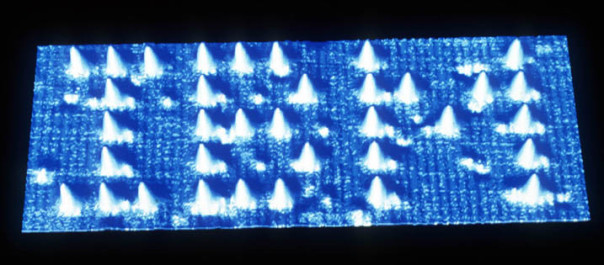
Scanning probe microscopes image a sample by running a physical object over the surface; the two most common types are the atomic force microscope (AFM) and the scanning tunnelling microscope (STM). Both AFM and STM can magnify by one hundred million times, and AFM produces a three-dimensional image of the sample being studied.

An AFM works by running a tiny sharp point attached to the end of a thin metal bar (a cantilever) over a surface and measuring the deflection of the cantilever. In Contact AFM the probe is in actual contact with the sample and deflection of the cantilever is measured directly. In Non-Contact AFM the probe is vibrated above the sample and changes in the vibration of the cantilever due to van der Waal’s forces between the probe and the sample are measured to create an image. Non-contact AFM has the advantage that is does not damage the AFM probe.
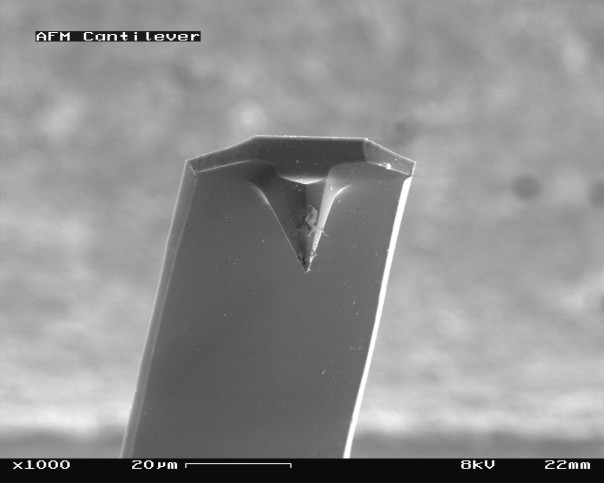
afm-probe-used

Used AFM probe.

A scanning tunnelling microscope makes use of a quantum mechanical effect known as quantum tunnelling. A conducting probe is brought close to the sample, and a voltage is applied between the sample and the probe. This causes electrons to “tunnel” through the vacuum between sample and probe, and this flow of electrons constitutes an electric current. As the probe is moved across the sample the current changes, and this changing current is used to create an image. STMs can only image conducting materials, so a very thin coating of a heavy metal like gold is usually applied. STMs are also more difficult to run, requiring a very good vacuum, but they can image larger areas and do so more quickly than an AFM.

STMs can also be used to move individual atoms, dragging them across a surface. IBM famously created a version of their logo by moving around thirty-five xenon atoms on a copper surface.

ibm-stm

Automatically removing foreign objects from photographs

Imagine that you’re on holiday, trying to photograph a famous landmark. There are sure to be other tourists around, messing up your photographs. But what if there were a way to automatically remove these interlopers from your photographs?

Here are eight photographs of the street outside a local car park, taken from the car park’s roof. In each of the photographs there is some sort of foreign object present – either a pedestrian or a car.

IMG_6524 IMG_6525 IMG_6526 IMG_6527 IMG_6528 IMG_6529 IMG_6530 IMG_6531

Below is a copy of the image, but with all of those foreign objects removed. This isn’t the result of hours of painstaking manipulation – it’s the result of running one special filter, a median layer blend, on the collection of images.

blend-resultThe median layer blend works by taking the colour values for the same pixel in each photograph and then using the median value as the value used in the output image.

For example, if the red values for the first pixel in each image were 234, 234, 197, 251, 222, 193 and 218 then the median would be 218, as it falls in the middle when they are arranged in order (193, 197, 213, 218, 222, 234, 234, 251). Because each foreign object is in a different position in each frame, the RGB values for the pixels that make them up will lie at either end of the scale, and those values will be eliminated when the median layer blend filter is applied.

It is very important that whilst taking your images that the camera remains in a fixed position; if the camera is allowed to move you end up with a blurry and oddly smooth image. The leaves in the output photograph above are slightly blurred because they were moved by the wind as the original photographs were being taken.

This technique is also very useful when taking photographs with a high ISO setting in low light. Images taken in low light are prone to noise, but because this noise is different in every image, a median layer blend filter does a very good job of removing this noise.

Here is a boring image of a London Tube network map, taken at ISO 3200 in poor light.

tube-map-original

If we look closely, the image is very noisy.

tube-map-original-closeupBut after running ten of these images through a median layer blend filter, the noise is very satisfactorily removed.

tube-map-comparison

L-R: The original noisy image and the resulting “de-noised” processed image.

I used the GIMP image processing software with the G’MIC plugin to create the images above, but I’m pretty sure similar tools are available for other packages (e.g. Photoshop).