A quick warning: if you don’t know what Little Printer is, and you’re not interested in PHP/HTML/CSS then this post probably isn’t for you. I’m putting this post up mainly as a HOWTO for those searching for information.
I recently bought a Little Printer from the fine folks at BERG and fell in love straight away. I decided it would be fun to try and produce my own publications for it. I am not a website developer (all the behind-the-scenes stuff for MrReid.org is handled by WordPress) and I’m not much of a programmer either,* but I found the process reasonably easy; BERG’s documentation is very good.

A Little Printer publication is basically a small website (like this). The content is regular HTML and it is formatted with CSS as with any other website.
You need four things for a working Little Printer publication:
- Your content in HTML and CSS format hosted somewhere.
- meta.json, a JSON file containing metadata about your publication such as its name, how often it’s published, etc.
- An ETag that tells BERG Cloud when content has been updated.
- An icon, 55×55 pixels in PNG format, that BERG uses when listing your publication.
meta.json
BERG provides some good documentation for the meta.json file. Embedded below is a copy of the meta.json file I used. I’m not clever enough to work with user-defined options so the external_configuration and config keys are missing.
This file contains hidden or bidirectional Unicode text that may be interpreted or compiled differently than what appears below. To review, open the file in an editor that reveals hidden Unicode characters.
Learn more about bidirectional Unicode characters
| { | |
| "owner_email" : "example@example.com", | |
| "publication_api_version":"1.0", | |
| "name": "Publication name", | |
| "description": "A descriptions of your publication.", | |
| "delivered_on": "A description of how often your publication is published, e.g. 'every Sunday' or 'weekly'.", | |
| "send_timezone_info": false, | |
| "send_delivery_count": false, | |
| "external_configuration": false | |
| } |
ETags
This was the part I found most difficult, because I had no idea what an ETag was. It turns out that an ETag is a little bit of code sent in the header of a webpage that identifies the content of the page. If you change the ETag of a page then any crawlers/spiders visiting the page will know that it has been updated.
As I understand it (and it’s entirely possible I’m completely wrong) then what happens is that BERG Cloud’s servers check your publication’s webpage at the user-selected delivery time and only send it to Little Printer if the ETag is different to the last time it was polled for that user.
ETags need to be inserted into your page before any HTML, including before the DOCTYPE declaration. I used the PHP code below to generate and embed ETags into my publications.
This file contains hidden or bidirectional Unicode text that may be interpreted or compiled differently than what appears below. To review, open the file in an editor that reveals hidden Unicode characters.
Learn more about bidirectional Unicode characters
| <?php | |
| // You need to pick one of the following lines, based on how often your publication will be updated | |
| // The value of the 'date' function will then be hashed to produce the ETag | |
| // date = date(z); // Generates ETag based on the day of the year, so publication updates daily | |
| // date = date(W); // Generates ETag based on the week number, so publication updates on Monday of each week | |
| // date = date(F); // Generates ETag based on the month, so your publication updates monthly | |
| date = date(c); // Generates ETag based on the current date and time, so your publication updates every second (but will only be polled by BERG Cloud for each user once per day at the scheduled time) | |
| // Generates MD5 hash of your given value | |
| $md5 = md5($date); | |
| // Sets the previously generated hash value as the page's ETag | |
| header("ETag: ".$md5); | |
| ?> | |
| <!– Begin HTML for your publication –> | |
| <!DOCTYPE html PUBLIC "-//W3C//DTD XHTML 1.0 Strict//EN" | |
| "http://www.w3.org/TR/xhtml1/DTD/xhtml1-strict.dtd"> | |
| <html xmlns="http://www.w3.org/1999/xhtml"> |
Formatting
BERG provide a style guide for Little Printer publications; it’s worth bearing in mind that you can only use the fonts that BERG provide. You cannot use web fonts.
Publications need to be 384 pixels wide. I used the following CSS as a template for my publications:
This file contains hidden or bidirectional Unicode text that may be interpreted or compiled differently than what appears below. To review, open the file in an editor that reveals hidden Unicode characters.
Learn more about bidirectional Unicode characters
| body { | |
| margin: 0px; /* This prevents WebKit from adding an eight-pixel margin to your publication. */ | |
| padding: 0px; | |
| border: 0px; | |
| font-size: 24px; /* Twenty-four pixels is about as small as you want to go for text to still be legible. */ | |
| font-family:'Times'; /* Select your fonts from BERG's list: http://remote.bergcloud.com/developers/style_guide/fonts. */ | |
| } | |
| .page { /* Enclose your entire publication in this DIV (e.g. "<div class='page'>") to prevent your publication being too wide. */ | |
| width: 384px; | |
| } |
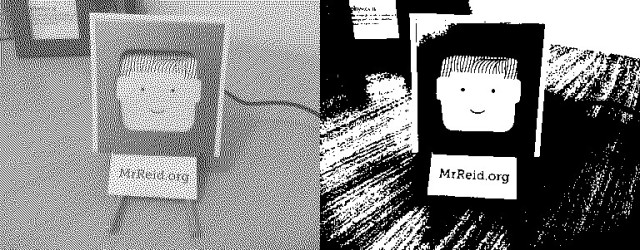
If you’re going to use images in your publication then you need to assign the class dither to images (e.g. <img class="dither" src="filename.jpg">), otherwise they’ll be thresholded in the rendering process.
Dithered image on the left, thresholded image on the right. The dithered images look much better printed on Little Printer than they do on screen above.
You can find the code for both my publications, Constellatio and World Population, on GitHub: Constellatio and World Population. Please feel free to fork the code.
I wouldn’t have decided to make a Little Printer publication if I hadn’t read revdancatt’s post about how easy it is to create publications; and Alex Forey’s Little Printer PHP Framework gave me the idea to use PHP to generate and embed ETags. Huge thanks to both of them.
* If it’s any indication of how much of a n00b I am, all of the code for my publications was written either in Notepad or in the GitHub in-browser editor. Some of the commit summaries explain the difficulties I had.
